Make a photo contact sheet on Mac: select, label and export
A contact sheet puts a set of photos on one page, so that you can choose from them, show them to someone or file them away. This guide starts with what your Mac already has, then shows a sheet laid out like a roll of film, with the picks marked, in Grain Archive Lab, our Mac app.
Short answer. For a plain grid, use what you have. Apple Photos prints several photos on a page with its Contact Sheet format [1], and the macOS Print dialog saves any print as a PDF [2]. Lightroom Classic has contact sheet templates in its Print module and can print the file name under each photo [3]. Grain Archive Lab lays a session on strips of film, circles your picks, crosses out your rejects and exports the sheet as PDF, JPEG or TIFF. Whatever the tool, sort the photos before you lay out the page, and read the exported file before you send it.
Choose the simplest tool for the sheet you need
| You need | Use | What it gives you |
|---|---|---|
| A quick grid to print or keep as a PDF | Apple Photos, Contact Sheet format | Included with macOS: File › Print, then a format; Save as PDF from the Print dialog [1] [2] |
| File names, titles or captions under the photos of a Lightroom Classic catalog | Lightroom Classic, Print module | Contact sheet templates; Photo Info prints the file name, title, caption or other metadata below each photo [3] |
| A sheet that reads like a roll, with your picks and rejects marked | Grain Archive Lab | Strips of 35 mm or 120 film, pick and reject marks, a header and captions; PDF, JPEG or TIFF |
You do not need a paid app for a plain grid. Grain Archive Lab is worth it if the contact sheet is one step of a longer job: sorting a session, developing it with film looks, then showing it the way photographers chose frames from a roll. The steps for Lightroom Classic come from Adobe’s page for its Print module [3]; other Adobe apps are not covered here.
Select and order the photos before laying out the page
A sheet is useful when it shows the right photos in an order that makes sense: a shoot in the order it happened, a set a client asked for, one roll. Decide what the sheet is for before you choose a layout:
- Every frame, for an archive or a proof someone will choose from.
- The picks only, to confirm a selection.
If the sheet shows file names, they become the reference people use to ask for a photo. Make sure they are names you will find again.
- Apple Photos: select the photos in the library before you choose File › Print [1].
- Lightroom Classic: select them in the Library module; a Quick Collection or a collection keeps the selection for next time [3].
- Grain Archive Lab: open the folder as a session with New Session from Folder (⇧⌘O), then sort it in Library: P to pick, X to reject, U to unflag. ⌥⌘1 to ⌥⌘4 show all the photos, the picks, the unflagged photos or the rejects. The sheet takes the photos Output shows: the selection when it holds two photos or more, otherwise every photo shown by the filter.

Make a basic contact sheet with Apple Photos
Apple describes these steps for Photos [1]:
- In Photos, click Library in the sidebar, then select the photos.
- Choose File › Print.
- In the print options, select the Contact Sheet format. With this format, you can resize the printed photos.
- Choose a printer and its settings, then click Print.
For a PDF instead of paper, click PDF in the macOS Print dialog, or open its PDF menu, and choose Save as PDF [2]. Apple’s page describes the format, not the captions or margins it prints, so look at the preview before you save.
Make a film-strip sheet with picks in Grain Archive Lab
In Grain Archive Lab, the contact sheet is a view of Output, with one setting for the whole sheet:
- Sort the session in Library, as above.
- Go to Output (⌘3) and choose Contact sheet.
- Set the sheet:
- Film: the strips of 35 mm or 120 film the photos sit in, numbered across the strips, with their edge print.
- Paper: A4 or US Letter, portrait or landscape, with the strips on the paper or on black.
- Marks: Circle circles the picks and crosses out the rejects; Dot puts a small dot on the picks and a stroke through the rejects; Off leaves the sheet without marks.
- Header: a line such as ROLL 01 · 36 EXP. · the date, which you can change.
- Captions: none, the look of each photo, or its file name.
- Export the sheet (⌘E) as PDF, JPEG or TIFF, or print it (⌘P).
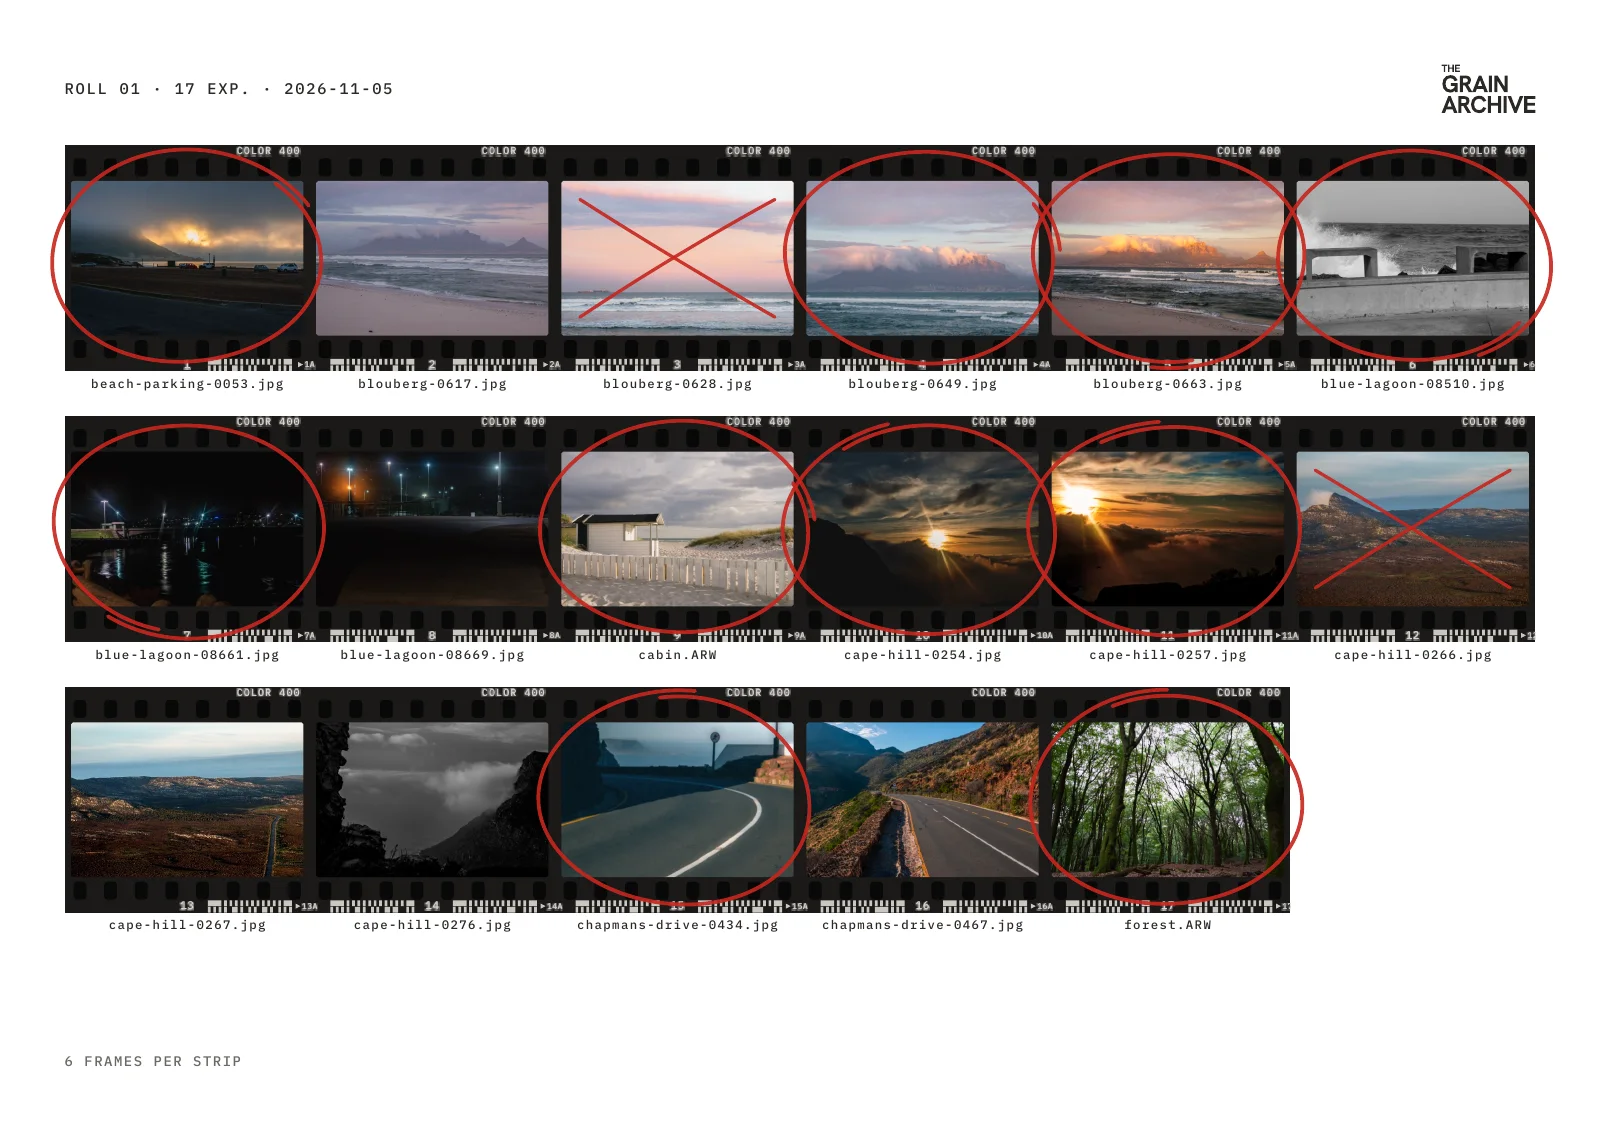
The marks come from the sorting: the photos picked in Library are circled, the rejects crossed out, as with a china marker on a printed sheet. The sheet shows each photo as you developed it, with or without a film look. A sheet exported from the free trial carries the TRIAL watermark, like every export of the trial.
Choose captions, paper size and readable thumbnail sizes
- Captions. The file name is the safest caption when someone has to ask for a photo. In Grain Archive Lab, the look’s name helps when you compare edits. Lightroom Classic can also print the title, the caption, the date, the camera or the exposure, taken from the photo’s metadata [3]. Leave captions off for a clean proof.
- Paper. Use the paper of whoever prints it. A4 and US Letter do not have the same shape: in landscape, a Letter page is narrower and slightly taller than an A4 page, so a layout made for one page gets new margins on the other.
- Size of the photos. Fewer photos per page means larger frames and captions. Apple Photos lets you resize the printed photos with the Contact Sheet format [1]; in Lightroom Classic, you change the margins and cells of the layout [3].
Judge the sizes at print size, not on a zoomed screen: print one page, or open the PDF at its actual size, before you send a set of pages.
Export or print, then check filenames, cropping and page breaks
Open the exported file and check it before it leaves your Mac:
- The count and the order. As many frames as photos you meant to include, in the order you chose.
- The names. Each caption matches its photo and is readable at the size the sheet will be printed or seen.
- The cropping. In Lightroom Classic, Zoom to Fill fills each cell and crops the edges of the photo when needed; turn it off if the whole frame matters [3].
- The marks. Picks and rejects as you decided them.
- The page breaks. On a sheet of several pages, see where each page ends.
Troubleshooting: missing photos, tiny captions and cut-off images
- Photos missing from the sheet. In Apple Photos, the sheet prints the photos you selected before File › Print [1]. In Grain Archive Lab, the sheet follows Output: with two photos or more selected, only those; otherwise the photos of the filter. Press ⌥⌘1 to show them all, and turn Marks off for a sheet without marks.
- Captions too small. Put fewer photos on the page, use a larger paper, or print fewer details under each photo.
- Photos cut off. In Lightroom Classic, check Zoom to Fill and Rotate to Fit in the Image Settings panel [3]. Everywhere, compare the PDF with the photos it should show.
- RAW files. Grain Archive Lab opens the RAW files of the cameras macOS supports, as well as JPEG, HEIC, TIFF and PNG.
Make one with Grain Archive Lab
If a film-strip sheet with your picks marked is what you need, the contact sheet of Grain Archive Lab does it from the same session you sorted and developed. It runs on Macs with Apple silicon, macOS 15 Sequoia or later, and its free trial is the complete app, with a TRIAL watermark on exports.
To develop the photos of the sheet first, see how to make digital photos look like film on Mac.
Sources
- 1M Apple: Print your own photos on Mac, Photos User Guide (macOS 27) Accessed November 5, 2026.
- 2M Apple: Save a document as a PDF on Mac, Mac User Guide Accessed November 5, 2026.
- 3M Adobe: Print module layouts and templates, Lightroom Classic (updated September 25, 2023) Accessed November 5, 2026.
M: manufacturer